10 Aerated Static Pile Method
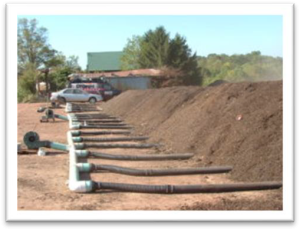
An aerated static pile Composting method involves premixing of the Compost material and placing it in bays over top of perforated pipes typically with blowers attached that help to aerate the pile without physical manipulation. An Aerated Static Pile system is typically engineered and designed by an external contractor as the size of blowers and or bays is dependent on the types and volumes of raw material to be composted. This is meant as a guide only to describe some of the factors that should be considered.
Equipment and Materials
- Equipment needed mix and receive compost materials.
- Loaders, skid steers etc.
- Air blowers and perforated pipes based on the design of your Aerated Static Pile Composting system.
- Compost Temperature Guage
- Area for receiving food scrap materials,
- Area for storage of “browns”. Straw, Wood Chips, Leaves etc.
- Area for Curing and Finished Compost piles.
Setting up and Operating an Aerated Static Pile Composting System
Step 1 – Preparing area and feed stocks
- Prepare area for receiving materials. Keep a separate area for food scraps and a separate area for your “brown”materials.
- Food scraps must either be incorporated into a compost pile, or covered with soil, brown material, or finished compost every day in order to prevent animal encounters.
Step 2 – Mixing your Materials
- Mix your food scraps with brown materials.
- The recipe will vary depending on your feed stocks.
- Typically, the mix is 2x volume of brown materials to Volume of Food Scraps with an even mixture of bulkier wood chips and more easily digestible brown materials such as leaves or straw.
- Pile mixed materials into compost bay and cover any exposed food scrap material with finished compost, or soil or cover dependent on your system specifics.
Step 3 – Monitoring
- Measure internal temperature of Compost pile with Compost Temperature probe and record every day.
- Dependent on your system, you may measure oxygen levels, and moisture levels in the System.
Step 4 – Recovering Bulking agents (optional)
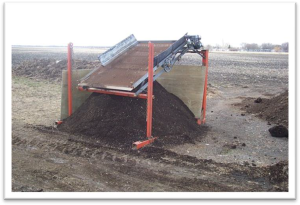
- If you are using Wood Chips in the mix and wish to reuse them in subsequent compost batches you can screen these out to utilize again.
Step 5 -Curing
- Place compost that is no longer heating in a pile no taller than 5 ft tall and let sit for at least 30 days while continuing to monitor for temperature and moisture.
- If Compost is to be sold or used in home gardens it is advisable to get the Compost tested for Maturity either by using a Solvita Test kit, or through a germination test.
Step 6 – Screening
- Depending on its end use the material may need to be screened to provide a consistent compost mixture that gardeners recognize as a soil amendment.
- However, if Compost is to be utilized as a mulch or under trees it is not necessary to screen the product.
Step 7 – Finished Compost
- Finished Compost will look and smell like soil and may be used in many ways to add to the soil.
Organic materials are mixed and placed in bays over perforated pipes typically attached to blowers to keep piles aerated without physical manipulation of the Compost Pile.
Describe the Carbon Rich Materials. These are usually dry and dead materials such as fallen leaves, wood chips or sawdust, paper or cardboard, straw, etc. Typically with Composting Food Scraps, you will need two parts of “Browns” or Carbon-rich materials to every one part of “Greens” or Nitrogen Rich Materials. This ratio can be adjusted throughout the Composting process to create the best end product.
The leftover or discarded portions of food that are not consumed or used.
A Compost Maturity Test that measures CO2 and NH3 respiration.

