
Cardiovascular and Peripheral Vascular System
Assessment – Cardiovascular and Peripheral Vascular System
Peripheral Vascular Assessment
Peripheral vascular assessment includes the techniques of inspection and palpation.
Inspection
1. Assess the arms from fingertips to shoulders and perform inspection bilaterally.
- Assess size and symmetry, and note any swelling
- note the colour of the skin and the nailbeds
- inspect the venous pattern for prominent veins
2. Assess the legs from the groin to the toes bilaterally (anterior, lateral, and posterior)
- Assess size and symmetry, and note any swelling
- Note the colour of skin and nail beds
- Note the distribution of hair on the lower legs, feet and toes
- Inspect the leg for varicosities (ask the patient to stand for this)
- Note any pigmentation, rashes, scars, or ulcers (include toes and soles of feet)
Palpation
1. Assess the arms
- Palpate radial and brachial pulses (pulses are graded 0 to 3+)
- Palpate epitrochlear nodes (with the elbow flexed 90º, palpate 3 cm from medial epicondyle between biceps and triceps muscles)
- Assess capillary refill (press down on the nail, so it blanches, then let go and observe the time it takes to pinken)
2. Assess the legs (Don gloves for palpation of the femoral pulse and inguinal nodes)
- Palpate femoral, popliteal, dorsalis pedis, and posterior tibial pulses
- Palpate superficial inguinal nodes
- Note the temperature of legs and feet (use the backs of fingers and compare bilaterally)
- Look for edema, comparing sides for the prominence of veins, tendons, and bones
- If edema is present, assess for pitting edema (press with thumb for at least 5 seconds over dorsal feet, behind each medial malleolus, and over shins)
- Assess capillary refill (press down on the nail, so it blanches, then let go and observe the time it takes to pinken)
Advanced Techniques – Peripheral Vascular
Allen Test
The Allen test assesses the competency of the radial and ulnar arteries. Ask the patient to make a tight fist while compressing the ulnar and radial arteries. The patient opens hand, and one arterial compression is released. Repeat the test with the release of the opposite artery.
Assessment of Arterial Insufficiency
This test assesses arterial insufficiency of the lower extremities. Raise both legs to ~60º until foot pallor develops, usually within a minute. The patient then sits up and dangles feet. Note the return of pinkness in ~10 seconds and the filling of veins of feet and ankles in ~15 seconds.
Cardiovascular Assessment
Cardiovascular assessment involves inspection, palpation, percussion, and auscultation.
Inspection
- Inspect for jugular venous pressure (JVP) and carotid pulsations (performed if jugular venous distention (JVD) is present or suspected). Ask the patient to turn their head slightly away and use tangential lighting to inspect JVP bilaterally.
- Note the point of maximal impulse (PMI) using tangential lighting and inspect for abnormal pulsations (remove the patient’s gown enough to be able to see the anterior chest.
Palpation
- Measure jugular venous pressure (JVP)
- Ruler is placed vertically at the sternal angle; another straight object is placed at a right angle, so the lower edge rests at the top of the jugular pulsations.
- Measure the JVP by assessing the vertical distance between the sternal angle and the top of the pulsation point of the internal jugular vein (IJV); in healthy individuals, this should be no greater than 3cm.
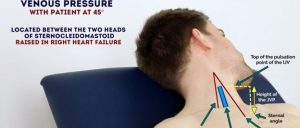
Figure 7.9 Venous Pressure (Geekymedics, n.d.)
- Assess the amplitude of the carotid pulse and feel for thrills.
- Use the first two fingers to palpate the carotid over the lower 1/3 of the neck–each side separately.
- Palpate the point of maximal impulse (PMI) and note its location, amplitude, and duration.
- Palpate at the midclavicular line at the level of the 4th and 5th intercostal spaces (below the nipple around the level of the bra line). Feel the impulse with one fingertip. If not felt supine, try positioning the patient in the left lateral decubitus position.
- Palpate for heaves, lifts, and thrills.
- Palpate the pulmonic area/left 2nd interspace to assess pulmonic artery impulse (left edge of the sternum about 2” inferior to the clavicle).
- Palpate the aortic area/right 2nd interspace to assess the aortic arch for pulsations (right edge of the sternum about 2” inferior to the clavicle).
- Palpate at the left sternal border in the 3rd–5th interspaces to assess systolic impulse of the right ventricle.
- Locate the correct interspaces. The 4th–5th interspace is at the level of the xiphoid. Then feel with fingertips at the same time in the three interspaces.
Percussion
- Percuss to determine the left border of cardiac dullness if PMI is not palpable.
- Percuss medially from the area of resonance left of the midclavicular line to the start of cardiac dullness.
Auscultation
- Listen for carotid bruits (ask the patient to hold their breath).
- Auscultate with the diaphragm in the aortic (second intercostal space and right border) and pulmonic areas (2nd interspace and left sternal border), then Erbs point along the left sternal border and 3rd. intercostal space and 5th intercostal space at the apex. 5th interspaces) and at the apex.
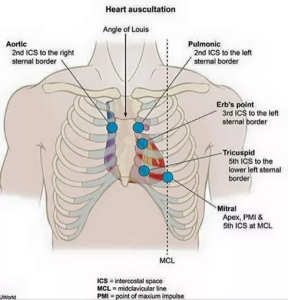
Figure 7.10 Heart Auscultation (Medgeeks, n.d.) - Note timing, intensity, and any splitting of S1 or S2
- Note where S1 or S2 are best heard.
- Start 2” below the clavicle at the right and left sternal edge, continue along the left sternal edge to the level of the bra line, and finish at the 4th–5th interspace around the midclavicular line.)
- Auscultate with the bell at the apex and along the left sternal border at the 4th and 5th interspaces (Tricuspid).
- Note any murmurs (Start at the 4th–5th interspace around the midclavicular line on the left side and finish at the right sternal edge).
- Auscultate with the bell at the apex in the left lateral decubitus position to listen for S3, S4, and the murmur of mitral stenosis (ask the patient to roll partly onto the left side).
- Auscultate with the diaphragm along the left sternal border and the apex with the patient leaning forward/exhaling, listening for aortic murmurs.
- Listen along the left sternal border and at the apex.
- Note rate, rhythm, and presence of extra sounds (S3, S4, systolic or diastolic sounds, or murmurs).
Advanced Techniques – Cardiovascular
Pulsus alternans
Feel the pulse for alteration in pulse amplitude by applying a blood pressure cuff to the arm and slowly lowering the cuff’s pressure while listening with a stethoscope over the brachial artery. Alternations in the pulse amplitude or doubling of Korotkoff sounds (sounds heard with a stethoscope on the brachial artery when taking blood pressure) indicate pulsus alternans, which can be a sign of left ventricular heart failure.
Paradoxical pulse
A paradoxical pulse is an exaggerated fall (10mmf Hg) in a patient’s blood pressure during normal inspiration. Assessment is made by inflating a blood pressure cuff until Korotkoff sounds are absent during inspiration, then slowly deflating the cuff and noting when the Korotkoff sounds return during inspiration. A drop greater than 10 mm hg may indicate cardiac tamponade, obstructive lung disease or constrictive pericarditis.
New York Heart Association (NYHA) Functional Classification System
The stages of heart failure as classified by the American Heart Association is a widely used tool in the medical world to describe patient symptoms along a continuum of heart failure ranging from the early stage of risk for disease without symptoms to advanced heart failure disease that interferes with a patient’s activities of daily living (AHA, 2023). The NYHA functional classification system rates patients based on physical activity limitations from no limitations to physical activity to marked limitations of physical activity (AHA, 2023). The following table identifies and outlines this classification system.
| CLASS | PATIENT SYMPTOMS |
|---|---|
| I | No limitations of physical activity |
| II | Slight limitations of physical activity |
| III | Marked limitations of physical limitations |
| IV | Symptoms of heart failure at rest, any physical activity causes discomfort |
VIDEO 7.8
Video
VIDEO 7.10
Peripheral Vascular
Examination Checklist
Documentation Assessment Findings
The patient appears well and in no acute distress. The patient denies chest pain or shortness of breath, and vital signs are within normal limits. The chest is absent of heaves, thrills, or abnormal pulsations, and there are no rashes or surgical scars visible. No JVD or peripheral edema is noted. S1 and S2 sounds are present, with regular rhythm and amplitude; no murmurs or extra heart sounds are appreciated. Skin is warm and dry, cap refill is brisk, no noted varicosities, and equal hair distribution to both lower legs.
