
Neurological System
Assessment – Neurological System
A complete neurological system assessment is divided into five parts:
- Level of consciousness/mental status (For More information see Mental Status Assessment)
- Cranial nerves
- Motor system
- Sensory system
- Reflexes
The assessment sequence starts with inspection and then observation for each of the five parts of the physical examination. The equipment needed includes coffee beans or vanilla, a wisp of cotton, penlight, tuning fork, reflex hammer, tongue depressor, salt, sugar, cotton-tipped applicator, a glass of water, and an ophthalmoscope.
Cranial Nerves
CN I, Olfactory
Check nasal patency and sense of smell in each nostril separately (Use two different scents).
CN II, Optic
Assess visual acuity using the Rosenbaum or Snellen chart, and screen visual fields by confrontation (patient looking directly at examiner)
- Stand in front of the patient and ask the patient to look in your eyes. Put both hands lateral to the patient’s ears. Wiggle fingers and bring hands forward one hand at a time until the patient can visualize your fingers. Repeat this in the upper and lower temporal quadrants. If you find a defect, check nasal fields–have the patient cover one eye at a time. Wiggle fingers of one hand on the same side as the eye that is covered and move from the ear across the face toward the opposite ear. Inspect the optic fundi using an ophthalmoscope.
- Darken the room and ask the patient to gaze into the distance and focus on one object across the room, which will help dilate the pupil (Stanford Medicine 25, n.d.).
- Place the ophthalmoscope against your cheek with your hand; this allows the head, hand, and ophthalmoscope to move as one unit.
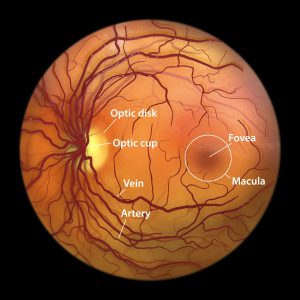
- Use your right hand and right eye to examine the patient’s right eye. Look through the ophthalmoscope, adjusting the focus as needed. Direct the ophthalmoscope 15 degrees from the center and look for the red reflex; once found, follow the red reflex until you see the retina. If you lose the red reflex, return and repeat until you find it again. To look around the retina using a traditional direct ophthalmoscope, you should “pivot” the ophthalmoscope, angling up, down, left, and right (Stanford Medicine 25, n.d.). A normal optic fundus will have an optic cup, fovea, optic disc, smaller pale arteries, and a larger, darker vein structure.
Visual Acuity
| Normal Findings | Abnormal Findings |
|---|---|
| Normal distant visual acuity is 20/20; this means that the patient can read what a person with normal eyesight can read at 20 feet. | A higher denominator means poorer distant visual acuity. Nearsightedness • known as myopia, is poor visual acuity; distant objects appear blurred Farsightedness • known as hyperopia, is the ability to see distant objects clearly, but objects nearby may be blurry. Presbyopia • is the inability to focus clearly on near objects |
CN II, Optic and III, Oculomotor
- Assess the size, pupil shape, and reaction to light (direct and consensual). Typically, light focused on one eye causes both eyes’ pupils to constrict (consensual). The change in pupil size in the eye being illuminated is the immediate reaction. The direct response is the change in pupil size in the eye to which the light is being directed.
- Assess the near reaction (Hold a finger or a pencil ~10 cm from the patient’s eye and ask him/her to look alternately at it and into the distance directly behind it.). There should be a brisk and large response to the light.
CN III, Oculomotor
- IV, Trochlear; VI, Abducens: Test extraocular movements – test lateral, upper, and lower temporal quadrants by making a large H in the air to lead the patient’s gaze.
- Test convergence (simultaneous inward rotation of both eyes toward each other) by asking the patient to follow your finger to her nose. Remember to instruct the patient to keep their head still and move their eyes only.
CN V, Trigeminal
Motor
Test the strength of temporal and masseter muscles by placing your fingers over temporal and then masseter muscles and asking the patient to clench teeth; note the strength of contraction.
Sensory
Test the light touch sensation on the forehead, cheeks, and jaw. Ask the patient to close their eyes, use a fine wisp of cotton, and gently touch the face in all three areas to assess the ability to sense light touch.
CN VII, Facial
Ask the patient to raise eyebrows, frown, close eyes so tightly that the examiner cannot open them, show teeth, smile, and puff cheeks (Observe face at rest and during the conversation, then ask the patient to perform these maneuvers.
CN VIII, Acoustic
- Assess patient hearing using the whisper test (the examiner stands at arm’s length behind the seated patient.
- Each ear is tested individually while the patient’s other ear canal is occluded with gentle finger pressure on the tragus while rubbing the tragus in a circular motion to mask the sound. The examiner should exhale before whispering to limit whisper loudness.
- A series of three letters and numbers is whispered (e.g., 2 B 8), and the patient is asked to repeat them. The test is passed if all three numbers and letters are repeated correctly.
- Alternatively, hearing can be assessed by rubbing your fingers together (the examiner rubs two fingers together and records how far away from the ear the patient can hear).
CN IX, Glossopharyngeal, CN X, Vagus
- Assess the patient’s voice quality and movement of the soft palate by depressing the tongue with a tongue blade and asking them to say “Ah.” Use a penlight to note the symmetric elevation of the soft palate and a midline uvula.
- Test the gag reflex (warn the patient what you will do, then lightly touch the back of the throat with a tongue blade. Be aware that some patients have sensitive gag reflexes.)
CN XI, Spinal Accessory
- Place your hands on the patient’s shoulders and ask them to shrug their shoulders and turn their head against gentle resistance.
- The patient should easily be able to raise their shoulders and turn their head from side to side.
CN XII, Hypoglossal
- Assess the tongue.
- Ask the patient to open their mouth; inspect the tongue both in the mouth and then protruding.
- Ask the patient to move the tongue from side to side.
- There should be smooth movement of the tongue, movements should be symmetric, absent of deviation to either side, and the examiner should not note any abnormal movement or fasciculations of the tongue during the examination.
Quick Cranial Nerve Test:
Motor Assessment
The motor system function has four components:
- Involuntary movements
- Body position
- Muscle bulk
- Tone and strength
- Coordination
Observation/Inspection
- Observe body position during movement and at rest.
- Note any tremors, tics, or fasciculations (Observe face; ask the patient to hold hands out for a few seconds).
- Inspect muscle size and contour and note symmetry and any atrophy (Pay particular attention to hands, shoulders, and thighs. For hands, combine with step 2. Then lower gown briefly to look at shoulders and raise gown to look at thighs).
Muscle Tone Upper and Lower Extremities
- Assess muscle tone
- Looking for resistance to passive stretch, the patient should be relaxed.
- Upper Extremities (UE)
- Grasp the patient’s hand with your hand, support the patient’s elbow, and flex/extend fingers, wrist, and elbow, using a circular motion for the shoulder–this can all be done with one smooth motion.
- Lower Extremities (LE)
- Place one hand on the patient’s thigh; grasp the foot with the other hand and flex/extend the knee and ankle on each.
Muscle Strength Testing Upper and Lower Extremities
- Elbows Flexion/Extension
- Elbows are flexed, thumbs toward the patient
- Apply resistance at the wrists while the patient flexes, then extend the elbow.
- Wrists Extension
- Patient makes a fist, arms out in front
- Try to push down on hands while the patient resists
- Grip Strength
- Place middle finger on top of index finger
- Patient squeezes fingers as hard as possible, while you attempt to withdraw fingers
- Do both sides simultaneously for comparison
- Finger Abduction
- Patient spreads fingers apart wide; try to force them together by pressing on the lateral aspect of the index and fourth fingers.
- Thumb Opposition
- Patient touches thumb to little finger
- Hook your finger under the thumb to resist
- Hips Flexion and Extension
- With the patient seated, place a hand on the thigh, and ask the patient to raise their leg against resistance
- Then slip your hand under the thigh and ask the patient to push down
- Do bilateral–can do flexion and extension on opposite sides simultaneously
- Hips Abduction/Adduction
- With the patient seated, legs relaxed, place your hands on the lateral aspect of both knees and ask the patient to try to abduct the knees further.
- Now move hands to the medial aspect of the knees and ask the patient to adduct against resistance.
- Knees Flexion/Extension
- With the patient seated, place hands on shins and ask the patient to straighten knee against resistance, then curl fingers around to grasp the lower leg and ask the patient to flex against resistance
- Ankles Dorsiflexion/Plantar Flexion
- Place hands beneath both feet; ask the patient to press down like stepping on a gas pedal, then move fingers to the dorsal aspect of the foot and ask the patient to pull up against resistance
Coordination
- Upper Extremity
- Rapid alternating movements/point-to-point movements
- Strike hand on thigh, turn it over, and strike thigh with the back of the hand. Patients should do this as rapidly as possible.
- For point-to-point
- Have the patient touch your finger and then his/her nose alternately several times while you move your finger around.
- Watch for smooth and accurate movements; perform bilaterally
- Rapid alternating movements/point-to-point movements
- Lower Extremity
- Rapid alternating movements/point-to-point movements
- Holds hand under patient’s feet; patient taps hands as quickly as possible.
- For point-to-point
- Have the patient place one heel on the opposite knee and run it down the shin to the great toe
- Watch for smooth and accurate movements; perform bilaterally
- Rapid alternating movements/point-to-point movements
- Gait
- Walk across the room, tandem walk
- Ask the patient to take a few steps away from you, then turn and walk back
- Observe posture, balance, arm swing, and leg movement. Have him/her walk heel to toe
- Walk on toes and heels
- Hop in place or shallow knee bend.
- Elderly or less robust patients can rise from a sitting position and step onto a sturdy stool to test these motions
- Walk across the room, tandem walk
- Stance: Romberg and Pronator drift
-
- Romberg
-
-
- Patient stands with their feet together and closes their eyes
- Observe the ability to maintain an upright posture without swaying
-
-
- Pronator drift
-
-
- Patient stands with both arms outstretched, palms up, eyes closed for 20–30 seconds, then gently taps arms downward
- Position yourself to grab a potentially unsteady patient
-
Sensory System
Sensory System function includes Spinothalamic tracts and posterior columns: Pain and temperature occur through the spinothalamic tracts, vibration and proprioception (joint position sense) through the posterior columns and light touch through the spinothalamic tracts and posterior columns.
Test for light touch and pain using a cotton-tipped swab; use the soft end for light touch (or dull) and the wooden end for pain (or sharp sensation). Assess both sides of the body moving randomly with the patient’s eyes closed.
- Vary the testing pace so the patient cannot anticipate movements (Stimuli should routinely be applied lightly, and areas should be tested randomly rather than in a predictable pattern).
- Compare symmetry on both sides of the body (Basic testing should sample major functional subdivisions of the sensory system. Suggested pattern: Shoulders (C4), inner and outer aspect of forearms (C6/T1), thumbs and fourth fingers (C6/C8), both thighs (L2), medial and lateral aspects of calves (L4/L5), fifth toes (S1)
Special Sensory Tests
- Temperature
- Use test tubes filled with warm and cold water; can omit if pain sensation is normal
- Proprioception/Position sense
- Examiner grasps great toe, holding it by its sides; move the toe up and down several times, then pause and have patient identify position. If abnormal, move proximally for further testing
- Vibration
- Ask the patient to close their eyes; strike a tuning fork and place it over the distal interphalangeal (IP) joint of the finger and IP joint of the great toe. Ask the patient to state when it stops
- Discriminative sensations
-
- Stereognosis
-
-
-
- Identify an object by feeling it
-
-
-
- Graphesthesia
-
-
-
- Identify a number drawn in the palm with the blunt end of a pen
-
-
-
- Two-point discrimination
-
-
-
- Find the distance where one point of touch is perceived when two pressure points are applied
- The examiner may use a paper clip or calipers to apply pressure on two adjacent points
- Find the distance where one point of touch is perceived when two pressure points are applied
-
-
-
- Point localization
-
-
-
- Touch patient’s body with patient’s eyes closed; patient opens eyes and points to place touched
-
-
-
- Extinction
-
-
-
- Simultaneously touch corresponding areas on the body and ask the patient where touch is felt
-
-
Reflexes
Deep Tendon Reflexes
Upper extremities Biceps, brachioradialis (C5/C6), and triceps (C7/C8).
- Biceps reflex
- With patient’s arm flexed, palms down, with your thumb over biceps tendon, strike thumb with a reflex hammer
- Triceps
- With patient’s arm down or supported by you, strike tendon above the elbow with a reflex hammer
- Brachioradialis
- With patient’s forearm partly pronated, strike radius 1–2” above the wrist with a reflex hammer
Lower extremities Patellar (L2-L4), Ankle (S1/S2)
- Patellar reflex
- With patient’s knee flexed, tap patellar tendon with a reflex hammer just below the patella
- Ankle reflex
- Hold patient’s foot in slight dorsiflexion, then strike the Achilles tendon with a reflex hammer
Cutaneous stimulation reflexes
- Assess the abdominal skin reflex
- Lightly, briskly stroking the sides of the abdomen in an X pattern toward the umbilicus
- A normal positive response is a mild contraction of the abdominal muscles and slight movement of the umbilicus towards the source of the stimulation
- Assess the plantar reflex
- Stroke the sole from heel to ball, curving medially across the ball; this will help you determine whether or not you have a plantar reflex. Plantar flexion of the big toe is the typical reaction; the other toes frequently flex and adduct
Advanced Assessment Techniques
- Meningeal sign
- Place patient supine; check neck mobility
- Brudzinski sign
- Flex patient’s neck, watch for flexion of hips and knees
- Kernig sign
- Flex patient’s leg at hip and knee, straighten the leg, look for pain, and increased resistance
- Straight-leg raise
- Place patient supine, passively raise the patient’s leg, then dorsi flex the foot, and watch for evidence of pain radiating down the leg may indicate vertebral disc herniation
- Asterixis
- Ask the patient to extend their arms and dorsiflex the wrists, then spread the fingers; watch for jerky, irregular movements of the hands indicating loss of motor control
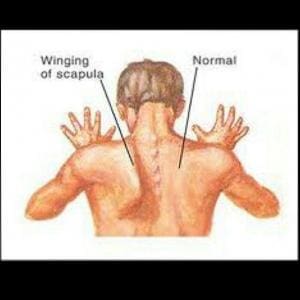
- Winging of the scapula
- Ask the patient to extend both arms and push against a wall; note abnormality of the shoulder blades or scapula
- A winged scapula is the result of a weak serratus anterior muscle not firmly anchoring the shoulder blade
- Ask the patient to extend both arms and push against a wall; note abnormality of the shoulder blades or scapula
Video
VIDEO 3.1
Motor System Assessment
VIDEO 3.2
Sensory Assessment
Examination Checklists
PRINTABLE 3.0
PRINTABLE 3.1
Documenting Assessment Findings
| Mental Status | The patient is alert and oriented to person, place, and time with normal speech. Memory is normal and thought processes are intact. |
| Cranial Nerves: (II, III, IV, VI) | Visual acuity 20/20 bilaterally. Visual fields are normal in all quadrants. Pupils are round, reactive to light and accommodation. Extraocular movements are intact without ptosis. (V) Facial sensation is intact to bilaterally to dull, sharp, and light touch stimuli. (VII) Facial muscle strength is normal and equal bilaterally. (VIII) Hearing is normal bilaterally. (IX, X) Palate and uvula elevate symmetrically, with intact gag reflex. Voice is normal. (XI) Shoulder shrug strong, and equal bilaterally. (XII) Tongue protrudes midline and moves symmetrically. |
| Reflexes | Biceps, brachioradialis, triceps, patellar, and Achilles are 2/4 bilaterally. No clonus. Plantar reflex is downward bilaterally. |
| Sensation | Sensation is intact bilaterally to pain and light touch. Two-point discrimination is intact. |
| Motor | Good muscle tone. Strength is 5/5 bilaterally at the deltoid, biceps, triceps, quadriceps, and hamstrings. |
| Cerebellar: | Finger-to-nose and heel-to-shin test normal bilaterally. Balances with eyes closed (Romberg). Rapid alternating movements normal. Gait is steady with a normal base. Coordination is intact as measured by heel walk and toe walk. |
