
Respiratory System
Assessment – Respiratory System
Inspection
Observe the general appearance of the patient with their chest exposed
- Look for any evidence of respiratory distress; observe the patient’s position, rate, rhythm, depth, and work of breathing.
- Assess the patient’s colour, looking for cyanosis, and listen to the patient’s breathing for audible wheezing.
Note any tracheal deviation
- Potential causes, if present, could be lung collapse, pneumothorax, or mediastinal mass.
- Look at the neck from the front of the patient, then place a finger alongside the trachea and note the space between it and the sternocleidomastoid muscle; compare to the other side.
VIDEO 5.1
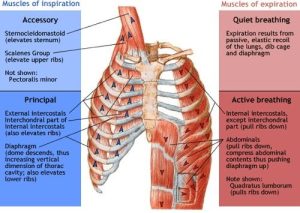
Look for the use of accessory muscles
- Use of accessory breathing muscles while at rest is a sign of respiratory distress. Accessory muscles include scalenes, sternocleidomastoid muscles, and intercostal muscles. Lifting of the sides of the nostrils (nasal flaring) could indicate excessive breathing effort.
- Look at the neck and supraclavicular area. Note any retraction of the interspaces during inspiration: Check lower interspaces anteriorly and posteriorly.
Palpation
Palpate the thorax anteriorly and posteriorly, noting any areas of reported pain or areas where lesions or bruising is evident.
Test for chest expansion by placing hands on the costal margin with thumbs pointed toward each other with a small fold of skin in between. Have the patient take a deep breath, then check for symmetry of expansion. Asymmetrical chest expansion may indicate conditions such as pneumothorax, rib fracture, severe pneumonia, or atelectasis.
Perform tactile fremitus
- Ask the patient to say ninety-nine as you move your hands.
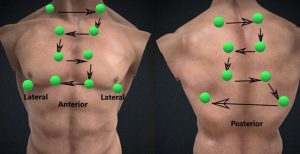
Anterior
- Using the ball of the hand or ulnar side of the hand, feel with both hands simultaneously. Start at the apex and move down to the xiphoid level, at the midclavicular line, stopping at just above the breast and starting under the breast.
Posterior
- Ask the patient to cross their arms in front. Start at the apex and move along the medial scapular border to the level of the 10th rib, then move laterally on each side.
VIDEO 5.2
Percussion
Percuss both sides of the chest at each level. Assess the posterior, lateral, and anterior chest .
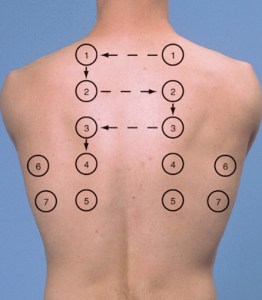
Posterior
- Ask the patient to cross their arms in front. Start at the apex and move along the medial scapular border to the level of the 10th rib, then move laterally (midaxillary line) on each side.
Anterior
- Using a ladder pattern, percuss both sides starting supraclavicular, moving down to the level of xiphoid along the midclavicular line, skipping the breast. Performing percussion supine will help displace breasts laterally.
- Use proper technique during percussion: Middle finger is hyperextended, and the distal interphalangeal (DIP) joint is pressed on the skin surface. The middle finger of the striking hand strikes the DIP joint with a brisk motion.
Percuss for diaphragmatic excursion (posterior chest only)
- Percuss first during quiet respiration to establish the approximate level of the diaphragm.
- During full expiration, percuss from the level of resonance (below scapula) to the level of dullness along the midclavicular line.
- Repeat during full inspiration and measure the difference. Repeat on the other side.
Auscultation
Auscultate anterior and posterior chest. Listen to breath sounds using the diaphragm of the stethoscope. Ask the patient to take deep breaths through an open mouth. Listen for expiratory and inspiratory sounds’ pitch, intensity, and duration. Identify any adventitious sounds such as crackles (rales), rhonchi, or wheezing.
Normal breath sounds include tracheal, bronchial, bronchovesicular, and vesicular. Vesicular breath sounds are heard over most of the peripheral lung fields; bronchovesicular sounds are heard over the main bronchi; tracheal and bronchial sounds are heard over the trachea .
Perform post-tussive auscultation if indicated.
- Post-tussive crackles:
- These crackles are not present normally on auscultation but can appear after a bout of cough. Crackles appear as the cough dislodges the thick secretions. It is present in early pneumonia, early tuberculosis, and lung abscess.
Anterior
- Auscultate comparing sides in a “ladder pattern,” starting at the apex and moving down to the level of the xiphoid along the midclavicular line, skipping the breast.
- Performing auscultation supine will help displace breasts laterally.
Posterior
- Ask the patient to cross their arms in front.
- Start at the apex and move along the medial scapular border to the level of the 10th rib, then move laterally (midaxillary line).
- Listen in two areas at and above the xiphoid level on each side.
Advanced Assessment Techniques
Perform voice transmission tests to assess suspected consolidation (bronchophony, egophony and whispered pectoriloquy).
When fluid or solid masses replace the air in the lungs, sounds are transmitted more clearly. The sounds that can be assessed are:
Using the same auscultatory steps, listen for changes as the patient says, “Scooby doo” (bronchophony) or any change from an “ee” sound to “ay” sound (egophony) or a clearer whispered voice (whispered pectoriloquy).
Whispered pectoriloquy: Ask the patient to whisper a sequence of words such as “one-two-three” or “Scooby doo” and listen with a stethoscope. Usually, only faint sounds are heard. However, over areas of tissue abnormality, the whispered sounds will be clear and distinct.
Bronchophony: Ask the patient to say “99” in a normal voice. Listen to the chest with a stethoscope. The expected finding is that the words will be indistinct. Bronchophony is present if sounds can be heard clearly.
Egophony: While listening to the chest with a stethoscope, ask the patient to say the vowel “e.” Over normal lung tissues, the same “e” (as in “beet”) will be heard. If the lung tissue is consolidated, the “e” sound will change to a nasal “a” (as in “say”).
Video
Examination Checklists
PRINTABLE 5.0
PRINTABLE 5.1
Documenting Assessment Findings
Normal respiratory assessment documentation example
Example #1.
The patient denies cough, chest pain, or shortness of breath. Denies past or current respiratory illnesses or diseases. Symmetrical anterior and posterior thorax. The anteroposterior-transverse ratio is 1:2. Respiratory rate is 16 breaths/minute, unlabored, regular, and inaudible through the nose. No retractions, accessory muscle use, or nasal flaring. Chest rise and fall are equal bilaterally. Skin is pink, warm, and dry. No crepitus, masses, or tenderness upon palpation of the anterior and posterior chest. Lung sounds clear bilaterally in all lobes anteriorly and posteriorly. No adventitious sounds. SpO2 saturation 99% on room air.
Example #2.
The patient is sitting comfortably with no increased work of breathing noted; rate and rhythm are regular but shallow at 24 bpm. Skin is pink, with no cyanosis noted. No wheezing or tracheal deviation noted, and no accessory muscle use or intercostal retractions visible.
