Head, Eyes, Ears, Nose and Throat System
Assessment – Head, Eyes, Ears, Nose and Throat System
Assessment of the Head, Ears, Eyes, Neck and Throat (HEENT) system starts with the head and moves distally toward the neck. For clarity, the physical assessment process will be divided into six anatomical regions: The head; the ears; the eyes; the nose and paranasal sinuses; the mouth and pharynx; and the neck.
Head
- Assessment of the head includes inspection of the hair, scalp, skull, face, and skin of the face and neck, and palpation of the skull.
Inspection
Hair
- Inspect the hair quantity, distribution, texture, and any pattern of loss (look at the head from several different angles).
Scalp
- Inspect the scalp for scaliness or lesions (including nits), part the hair in several places to thoroughly view the entire scalp surface.
Skull
- Inspect the skull for size, contour, and any asymmetry (look at the head front, sides, and back).
Face
- Inspect the face for expression and facial contours, note any involuntary movements or asymmetry
Skin
- Inspect the skin for any discoloration or lesions and observe the distribution of facial hair (focus the inspection of the skin on the face and neck).
Palpation
Skull
- Palpate the skull for deformities, masses, and skin lesions (palpate the entire scalp surface)
Ears
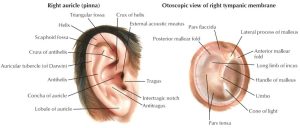
Assessment of the ears includes inspection of the auricles (Pinna), palpation of the auricles, assessment of auditory acuity, and otoscopic examination of the ear canal and tympanic membrane.
Inspection
- Inspect the auricles for any deformities, masses, or skin lesions
- Inspect the anterior auricle first then gently pull the auricle forward to inspect the posterior auricle.
Palpation
- Palpate the auricles, tragus, and mastoids for tenderness, nodules, edema
- Pull the auricle up and down, press on the tragus, and palpate over the mastoids
- Gross auditory acuity requires testing of cranial nerve VIII and can be completed using one of the two following methods:
- Stand 1–2’ in front or behind the patient, and rub two of your fingers together 1-2 inches in front of the opening to the auditory canal with the opposite ear occluded
- Stand 1–2’ in front or behind the patient, ask the patient to occlude one ear with a finger then whisper a two-syllable word, and ask the patient to repeat the word.
Otoscope Exam
- With two fingers, grasp the auricle firmly but gently and pull it upward, back, and slightly away from the head to extend and straighten the ear canal; hold the otoscope with the opposite hand and carefully insert the speculum into the ear canal directing it slightly down and slowly advancing it inward to view the ear canal and the tympanic membrane
- Inspect the ear canal for erythema, edema, cerumen, masses, foreign bodies, and discharge
- Inspect the tympanic membrane for color, contour, and important landmarks (malleolus, cone of light), perforations, and tympanic membrane mobility
Eyes
Assessment of the eyes includes testing vision through visual acuity evaluation, visual field screening, color vision, inspection, and an ophthalmoscopic exam.
Vision
Visual Acuity
Testing may include central or near vision acuity
Near vision
- Ask the patient if he/she wears corrective lenses and to put them on if so. Use the Rosenbaum chart at 14”. Ask the patient to cover one eye at a time and read the smallest print line possible, and then test both eyes at the same time.
Central vision
- Ask the patient if he/she wears corrective lenses and to put them on if so. Use the Snellen Eye chart with the patient positioned 20 feet from the chart. Ask the patient to cover one eye at a time and read the smallest print line possible, and then test both eyes at the same time.
Visual Field Testing
May include a peripheral and nasal defect or kinetic perimetry tests
Peripheral vision
- Stand in front of the patient and ask the patient to look at the examiner’s eyes. Put both hands lateral to the patient’s ears. Wiggle fingers and bring hands forward one hand at a time until the patient can visualize. Repeat this in the upper and lower temporal quadrants.
Nasal defect or kinetic perimetry
- Have the patient cover one eye at a time. Wiggle the fingers of one hand on the same side as the eye that is covered and move from the ear across the face toward the opposite ear.
Color Vision
A pseudoisochromatic color plate or card is used for assessing color vision

Inspection
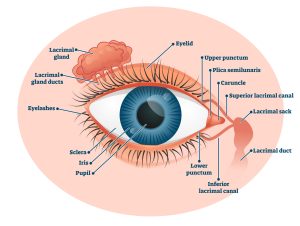
Inspect the eyelids
- Stand in front of the patient to fully view the eyelids and the eyelashes, note the direction of the lashes, any discolorations, masses, lesions, or edema
Inspect each lacrimal apparatus
- Stand in front of the patient and look at the region of the lacrimal gland and lacrimal sac; note any swelling or tearing
Inspect the conjunctivae and sclerae
- Use your fingers to gain adequate exposure to the sclera and conjunctiva; ask the patient to look side to side and up and down to expose the visible scleraInspect for conjunctival and scleral color, the presence of swelling, discharge, enhanced vascularity, or nodules
Inspect the corneas and lenses
- Use oblique lighting pointing directly to the iris and observe for opacities
Inspect the irises
- Use oblique lighting pointing directly lateral to the iris to assess the depth of the anterior chamber
Inspect the pupils
- Inspect the size, shape, symmetry, and reaction to light (direct & consensual) and accommodation
- Using oblique lighting, ask the patient to look into the distance and shine light into each pupil separately (pupils should be round, equal in size, with a brisk reaction to light
- To test the direct (pupillary constriction in the same eye) and consensual reaction (pupillary reaction in the opposite eye), shine the light in each eye twice.
- To check for accommodation, hold a pencil 10 cm from the patient’s eyes, and ask him/her to look at the pencil, then into the distance, and back at the pencil (watch for pupillary constriction and convergence when looking at the pencil, if the patient is able to focus on the pencil (must ask the patient as this is not visible to the examiner) note that accommodation is present.
Assess for the corneal light reflex
- Stand 2 feet in front of the patient and ask them to look at the light; observe the reflections of the light just nasal to the midline in the pupil.
Assess extraocular eye movements (convergence, conjugate gaze, nystagmus, and lid lag
- Test lateral, upper, and lower temporal quadrants by making a large H in the air to lead the patient’s gaze.
- Test convergence by asking the patient to follow your finger as you bring it to their nose.
Ophthalmoscopic Exam
- Darken the room and ask the patient to focus on a distant object.
- Use the correct hand/eye for each patient’s eyes (provider’s left hand/eye to patient’s left eye, provider’s right hand/eye to patient’s right eye).
- Hold the ophthalmoscope at a 15-degree angle from the patient’s eye 15” away and note the red reflex.
- Move closer to the patient (focus ophthalmoscope as you move closer).
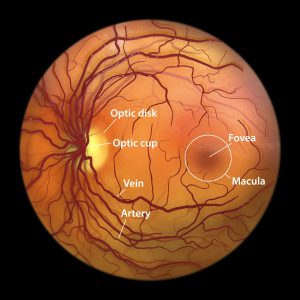
- Inspect the optic disc
- Note color
- Clarity of outline
- Size of the physiologic cup,
- Symmetry between eyes, and
- Any papilledema.
- Inspect the retina
- Distinguish arteries from veins
- Arteriovenous junctions
- Note any lesions, masses, hemorrhages, or exudate.
- Inspect the fovea and macula(ask the patient to look directly into the light)
- Note exudates
- Hemorrhages,
- Cysts.
Nose & Paranasal Sinuses
Assessment of the nose and paranasal sinuses involves inspection and palpation of the external surface of the nose, palpation of the nares, frontal and maxillary sinuses, transillumination of the sinuses, otoscopic nasal illumination of the internal nares, and nasal septum.
Inspection
- Inspect the external surface of the nose noting asymmetry, lesions, or deformities
Palpation
Nose
- Palpate for masses and tenderness; palpate the bone and cartilage medially and laterally.
Nares
- Assess the patency of each nare by occluding one nare at a time and asking the patient to breathe in through the nose
Frontal and Maxillary sinuses
- Assess for tenderness by palpating upward under the bony ridge of the eyebrow and upward over the maxillary sinuses.
- Transillumination of the sinuses
- This is a special test to assess for sinus congestion and inflammation.
- Normal sinuses are hollow and will illuminate with a reddish glow; sinuses that are obstructed by mucous and inflammation appear opaque because the light can not penetrate through the obstruction and inflammation.
- Place the light source upward under each brow to illuminate the frontal sinus. Place the light source below the eye and point downward; look at the roof of the mouth for illumination.
- Transillumination of the sinuses
Internal nose
- Illuminate both nares using an otoscope
- Insert a nasal speculum into each nare without touching the septum to visualize the mucosa, inferior turbinate, and nasal septum
- Assess the mucosa for color, swelling, bleeding, exudate, ulcers, and polyp; assess the septum for deviation, inflammation, and perforation
Throat
Mouth & Pharynx
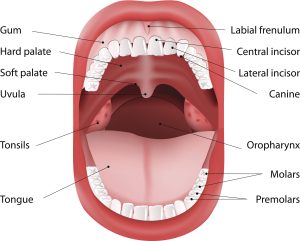
The mouth is assessed by inspecting the lips, oral mucosa, gums, teeth, hard and soft palates, the tongue, pharynx, and tonsils if they are present. Palpation in the mouth includes the tongue and the floor of the mouth, the gums and teeth, and the jaw.
Inspection
Lips
- Inspect for color, moisture, lesions, cracking, and scaliness
Oral mucosa
- Use a light and tongue blade to inspect color, areas of pigmentation, ulcers, white patches, and nodules
Gums
- Use a light and tongue blade to inspect color, swelling, ulceration, bleeding, and retraction
Teeth
- Note any dental caries, abnormal positioning, and missing teeth
Hard palate
- Use a light source to inspect for color, lesions, or masses
Tongue
- Ask the patient to stick out their tongue and then move it side to side to look for abnormalities; inspect tongue surface color, presence of lesions, and irregular textures or coating on the tongue.
Pharynx
- Use a light source and tongue blade to assess color, swelling, lesions, and symmetry.
Soft palate
- Use a light source and tongue blade to examine the uvula for redness, swelling, or deviation
Tonsils
- Inspect any visible tonsils in the posterior pharynx noting color, ulcerations, symmetry, hypertrophy, or irregular surface textures
Palpation
- Tongue and floor of the mouth
- Palpate the tongue and floor of the mouth noting any induration
- With gloves on, use a piece of gauze to hold the tip of the tongue, gently pull the tongue outward and lateral to visualize the sides and underneath of the tongue for abnormalities
- palpate the base of the mouth and sides of the tongue for induration (areas of elevation and firmness).
- Palpate the tongue and floor of the mouth noting any induration
Gums and teeth
- Using gloves, palpate over the upper and lower gums and teeth, noting any tenderness or presence of loose teeth
Jaw
- Assess the range of motion of the jaw by placing an index finger on each side of the jaw just in front of the tragus
- Ask the patient to open and close the mouth noting any swelling, tenderness, snapping, or clicking during movement.
Throat
- Physical assessment of the throat includes inspection of the neck, trachea, thyroid gland, and range of motion. Palpation consists of the lymph nodes, trachea, thyroid gland, cervical spine, and cervical muscles. The last assessment technique involves auscultation of the thyroid gland.

Inspection
Neck
- Inspect the anterior, lateral, and posterior neck, noting symmetry and the presence of scars and masses.
Trachea
Perform tracheal inspection in front of the patient noting any deviation
Thyroid gland
- Look at the patient from the front, fully expose the lower neck, then ask him/her to tip their head back slightly and swallow. Note the symmetry of the thyroid gland at rest and with swallowing.
Range of Motion
- Assess flexion, extension, rotation, and lateral bending by asking the patient to touch their chin to their chest, look up toward the ceiling, look side to side over each shoulder, and bring ear to shoulder bilaterally.
Palpation
Lymph nodes
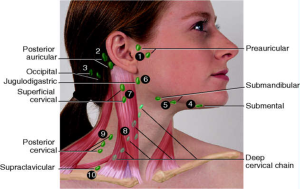
- Palpate (bilaterally) in front of tragus, postauricular into the hair at least an inch, base of the skull in the hairline, along inferior jaw line from temporomandibular joint (TMJ) to the middle of the chin, along the sternocleidomastoid (SCM) and anterior and posterior to the SCM from ear to clavicle, superior to clavicle from just lateral to the midline to the midclavicular line.
- Note lymph node size, shape, mobility, consistency, and tenderness
Trachea
- Place a finger between the trachea and SCM muscle, note the space and compare to the other side noting any tracheal deviation.
Thyroid gland
- Note size, symmetry, consistency, tenderness, nodules
- Stand behind or at the side of the patient and place index fingers just below the cricoid cartilage; ask the patient to swallow and feel for the movement of the thyroid gland. Next, displace the trachea to each side and palpate the lobes laterally between the displaced trachea and the relaxed SCM.
Cervical spine
- Note tenderness by palpating the midline over the spinous process from the base of the skull in hair through to the level of thoracic vertebrae #1.
Cervical muscles
- Palpate sides of the neck and over trapezius muscles from the base of the neck to the scapular spine, noting any tenderness or spasms.
Auscultation
- Thyroid gland
- If enlarged, auscultate for bruit
Advanced Assessment Techniques
Assessing tympanic membrane (TM) mobility
- Assessing TM mobility in response to pressure changes (Pneumatic otoscopy) helps to diagnose ear conditions such as fluid or infection in the middle ear, perforations of the TM, and eustachian tube disorders.
- A pneumatic otoscopy device is used in children; in adults, insufflation can be accomplished by having the patient plug their nose and exert gentle pressure on the ears by attempting to push air out of the blocked nasal passages. If the TM remains immobile; fluid or increased air pressure may be present behind the TM.

Assessing conductive versus sensorineural hearing loss
- Conductive hearing loss is often temporary and occurs when something blocks or reduces incoming sound; this blockage could be fluid, tissue, cerumen, or bony growth. Sensorineural hearing loss is often permanent; some causes of this type of hearing loss are older age, hereditary causes or birth defects, and noise exposure.
Weber Test
- Strike and place a tuning fork in the middle of the head or bridge of the nose and ask the patient which ear the sound is best heard or if it is equal.
Rinne test
- Strike and hold the tuning fork over the mastoid until the patient cannot hear the sound, then immediately hold the tuning fork, U facing forward, next to the ear and ask the patient if the sound is heard again.
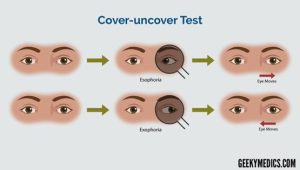
Cover/uncover test to test for strabismus (deviated eye)
- The cover-uncover test helps identify a tropia (misaligned eye).
- The test is done by covering one eye (usually with an opaque occluder device).
- The occluder is held before the eye for a few seconds and then removed.
- When the fixing eye is covered, the examiner will observe the non-occluded eye move to pick up fixation if a tropia is present.
- If no tropia is present, the non-occluded eye will remain stationary.
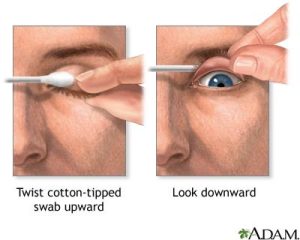
Eversion of lid and inspection of upper palpebral conjunctivae
- Use a cotton-tipped applicator to evert the upper lid.
- This technique can visualize a foreign body, lesion, or mass under the eyelid.
Video
VIDEO 4.1
Examination Checklists
PRINTABLES 4.0
PRINTABLE 4.1
Documenting Assessment Findings
The hair is clean. No nits noted. Facial expressions and movement are symmetrical. No involuntary movements are noted. The patient’s skin tone is appropriate for ethnicity, and they are not diaphoretic. Skin is free of lesions or discolorations. Nares are patent, and no drainage is present. The uvula and tongue are midline. Teeth and gums are in good condition. Patient can swallow without difficulty. Trachea is midline. There is no enlargement of the lymph nodes, no tenderness to palpation of head or neck structures, and no visible deformities, depressions, or lumps noted.
