
Speculum Exam and Papanicolaou (PAP) Smear
Step 1: Insertion of speculum
(i) Have the patient void prior to the examination
(ii) At the time of insertion, both the blade tips and bases should be aligned and secured in a closed position
(iii) Warm and lubricate the speculum with lukewarm water.
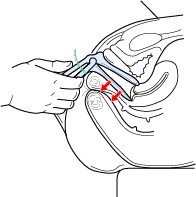
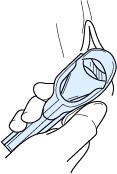
(iv) Grasp the speculum and spread the labia majora
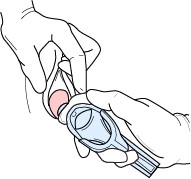
With gloved hands grasp the speculum in the dominant hand and use the other hand to spread the labia majora. Hook the index finger of the dominant hand over the base of the upper blade, to make your grasp firmer. Open the introitus (i.e., vaginal orifice) by spreading the labia majora from above, or from below, while applying downward pressure.
(v) Insert the speculum
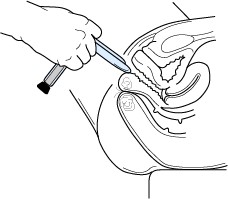
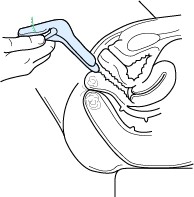
To provide for a smooth insertion, unimpeded by the vaginal walls, orient the speculum blades along the axis of the vaginal canal.
The vaginal axis runs from above to below the horizontal when a woman is in the lithotomy position.
Note that the blade tips should be placed against the lower (i.e., posterior) wall of the vagina, rather than the anterior wall, to avoid contact with the urethra. Ask the patient to take a deep breath to relax her vaginal orifice.
Hold the speculum with the handles straight down. Insert the speculum with gentle pressure posteriorly.
You may have to continue to spread the labia majora for smooth insertion. As it enters the vagina, maintain gentle pressure backwards along the length of the posterior blade.
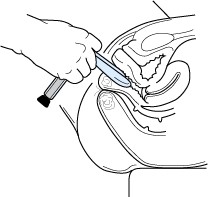
(vi) Rotate the speculum
Insert the speculum up to the base then rotate it parallel to the posterior wall of the vagina. This positions the speculum for the first attempt to view the cervix using only the blade tips.
In most women, gentle pressure of the lower base against the perineum is sufficient to place the blade tips in the posterior fornix.
The hand which was separating the labia can now be removed from the labia since it is no longer needed.
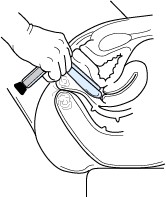
(vii) Open the speculum
Open the speculum as little as possible to see the cervix–greater vaginal distention is unnecessary and painful.
If this attempt is unsuccessful, the blade tips should be closed, the speculum withdrawn slightly, then reinserted more deeply and posteriorly, with the base of the lower blade actually compressing the perineum.
(viii) Apply pressure on the speculum
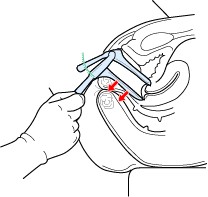
In pressing the lower blade against the posterior vaginal wall, exert pressure uniformly along the entire body of the blade.
If exerting greater pressure on the tip of the blade, the base of the blade acts as a fulcrum at the vaginal orifice–which may cause the base of the upper blade to hit the urethra. Some upward pressure on the anterior vaginal wall is unavoidable.
Step 2: Performing the PAP
(i) Gently wipe away excessive discharge or mucous, if necessary, with a large Q-tip or ring forceps holding a folded gauze pad. Do not touch the cervical os.
(ii) Obtain an ectocervical sample

Place the bifid end of the plastic spatula into the os of the cervix.
Use firm pressure and rotate 360 degrees around the cervix, while maintaining tight contact with the ectocervical (outside visible) surface. Include the entire transformation zone. To identify the T-Zone with your naked eye, look for the color change between the red columnar epithelium and the smooth pink mature squamous epithelium. If color changes are identified outside of the area first sampled (360 around the cervix), sample these areas too.
Withdraw the plastic spatula carefully to avoid contamination with the vaginal walls.
(iii) Transfer the sample to the liquid-based cytology solution
Rinse the spatula as quickly as possible into the liquid-based solution vial by swirling the spatula vigorously in the vial 10 times.
Discard the spatula.
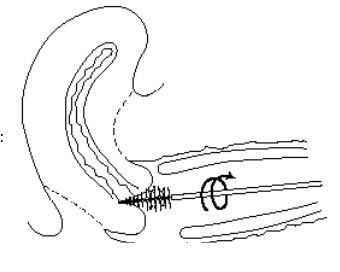
(iv) Obtain an endocervical sample
Over-rotating may damage some cervical cells and often induces more capillary bleeding, which in turn may increase post PAP spotting and temporarily increase the risk of sexually transmitted infections Gently insert the cytobrush deep into the cervical os until only the bottom-most fibers are visible.
Rotate slowly counterclockwise 1/2 a turn and then the other way half a turn and gently remove.
Remove the cytobrush carefully to avoid contamination by vaginal walls.
(v) Transfer the sample to the same liquid-based solution
Rinse the endocervical brush as soon as possible in the liquid-based solution. Rotate the device in the solution 10 times while pushing the brush against the vial wall. Swirl the brush vigorously to further release material.
Discard the brush.
Step 3: Removal of Speculum
(i) Release the speculum lever
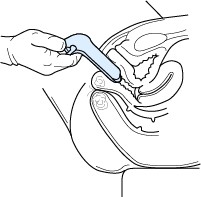
Once the cervix has been inspected and appropriate procedures are carried out, the speculum can be withdrawn. Release the speculum lever by pushing upwards on the notched locking tab, causing a clicking sound. It is recommended to warn the patient in advance that she should expect to hear this sound.
(ii) Withdraw speculum and inspect vaginal mucosa
During withdrawal, view the vaginal mucosa by keeping the blade tips partially open with your thumb. Rotating the speculum to either side during withdrawal will allow viewing of the posterior and anterior wall of the vagina. Only a partial opening of the blade tips are warranted for viewing, as a complete opening would unnecessarily distend the vaginal walls.
(iii) Remove speculum
As the blade tips are withdrawn through the vaginal orifice, they should be completely closed to avoid client discomfort. Irritation of the urethra is also a danger during withdrawal of the speculum; therefore, maintain pressure of the lower blade against the posterior wall. The posterior wall is quite resilient and can accommodate considerable pressure without discomfort to the patient. Always check to be certain space exists between the upper blade and the urethra.
